Friday, May 30, 2014

Chewy Apple Cinnamon Cookies for Breakfast

*edited 2/6/2015 

After having a friend ask me for some ideas for breakfast for her children, I got really excited about experimenting and coming up with some delicious and healthy goodies for her. This is the reason I am on a breakfast kick these days :) For the past 2 days I have been in the kitchen playing with a recipe and tweaking it to come up with one of my favorite combinations: Apple and Cinnamon.

I am a cinnamon lover. Not only does cinnamon taste great, but it has also been proven to be scientifically healthy. According to the U.S. National Library of Medicine, cinnamon is used to help treat muscle spasms, vomiting, diarrhea, infections, the common cold, and loss of appetite. It can also help to fight against bacterial and fungal infectionsfont-family: inherit;"> improve glucose and lipid levels, may help prevent Alzheimer's, and Penn State researchers revealed that diets rich in cinnamon can help reduce the body's negative responses to eating high-fat meals. (Whole article found here.)

These chewy cookies also have applesauce and olive oil. I think we all know how good those are for you, so I'll skip that part and continue on. One of my favorite things to do as a kid was to eat the dough when my mom or grandma were cooking. Since these have no eggs in them, you can all enjoy a little cheat taste while making them without any fear of getting sick. Great plus in my opinion :)


You only need about 15 minutes (this does not include distractions from the sweet children and/or husband and/or pets ;)) to make these from start to finish and get them on the table. Your family will be so excited when you tell them you are having cookies for breakfast! These will also make a great snack or healthy dessert. The options are limitless! Two things you need to be aware of: 1) The cookies are chewy and not hard (hence the name), so if your family does not like chewy soft foods then this recipe is not for you. 2) This recipe makes cookies with a pretty strong cinnamon taste. It's not overwhelming, but you can definitely taste it. If your consumers are not huge on cinnamon or only want a hint of cinnamon then I encourage you to reduce the amount.

Smiling while taking a bite is not very easy.
My little sweetie likes cinnamon as much as Mommy!


Chewy Apple Cinnamon Cookies
(Can be gluten free, dairy free, egg free, nut free, refined sugar free, Vegan, Vegetarian)
Serves 8 cookies

Ingredients
  • 1 cup + 4 Tbs. all-purpose gluten free flour ( or white wheat)
  • 1/4 tsp cream of tartar
  • 1/2 tbs cinnamon
  • 1/2 tbs baking powder
  • 1 1/2 tbs sweetener or two packets (Splenda, Stevia, or Sugar)
  • 1/2 tbs ground flaxseed 
  • 1 tbs olive oil
  • 1 cup applesauce, no sugar added/unsweetened

Directions
  1. Place all the dry ingredients into a large mixing bowl and stir well (the first 6 ingredients). 
  2. Pour the olive oil and applesauce into the mixture and stir until completely mixed. Should not be runny.
  3. Turn oven on to 400F degrees.
  4. Drop mixture onto a lightly greased baking sheet (I use spray oil) by using a tablespoon size spoon. Each cookie will be about 2 tablespoons.
  5. Press lightly onto the cookie with the back of the spoon to make sure the cookie is not too thick or it will not cook evenly. Do not press down too much or you will make the cookie too flat and thin.
  6. Place pan into oven and bake for around 10 minutes. Check on them at 10 minutes and every minute after that until they reach a firm shape to the touch (ovens cook very differently). 
  7. Let cool and enjoy! Try with peanut butter or your favorite nut butter on top or with sausage or bacon on the side for a rounded meal. 
Warning: These are addictive. Take care not to consume too much. :)


If you like this recipe, please feel free to CLICK one of the "Reactions" below above the comments and/or add this recipe to your Pinterest board and/or share on Facebook! Thanks!

Notes:
*The flaxseeds add a lot of wonderful health benefits to this cookie. It does make the cookies slightly more chewy, so I made it optional. With or without the flax these cookies are delicious. My husband ate 3 the first night I made them! Maybe try it both ways and let me know which one you like better!

Nutrition Facts:
(per cookie with 1/2 tbs flaxseeds and Stevia)
Cals-83, Fat-2.5g, Carbs-15.5g, Fiber-2g, Sugar-3g, Protein-1.7g

Wednesday, May 28, 2014

Easy Peasy Drop Biscuits

If you're like me and not a chippy energetic person the moment you wake up in the morning, these biscuits are for you! I need some caffeine, time in the Bible, and food in my system before I become capable of doing anything productive. This means making breakfast for my family is the last thing on my mind when I open my eyes. For this reason we are usually pretty laid back about breakfast, but there are times I really want to make something warm and tasty for my family to enjoy. Their smiling faces as they take a bite makes it all worth it. Good thing these biscuits make for an easy peasy quick and yummy breakfast. Just add some scrambled eggs or bacon, fresh fruit, and milk on the side to make a complete balanced meal. These biscuits are not good for cutting open and placing something inside, but pour delicious gravy or chocolate gravy or spread some mouth-watering butter, jelly, or peanut butter (Nutella anyone??) on top!


I found the original recipe here (allrecipes.com is such a great website!), but made my own alterations to make it gluten and dairy free. You will love these biscuits and even more how simple they are to make. My extremely picky 2.5 year old LOVES these with peanut butter. They even make a great snack later in the day IF you have any leftovers. Just throw them in a sealed bag and eat them within 3 days. 


Easy Peasy Drop Biscuits
(Can be gluten free, dairy free, nut free, egg free, refined sugar free, Vegan, Vegetarian)
Serves 6 large biscuits (can easily double recipe to make 12)

Ingredients
  • 1 cup all-purpose flour (gluten-free or white wheat)
  • 1/2 tbs baking powder
  • 1 packet of Splenda, Stevia, or sugar (2 tsp)
  • 1/4 tsp cream of tartar
  • 1/4 cup melted dairy free butter*
  • 1/2 cup dairy free milk**
Directions
  1. In a large bowl, mix flour, baking powder, sweetener, and cream of tartar.
  2. Pour in butter and milk and stir.
  3. Turn oven on at 450F degrees.
  4. Drop mixture by tablespoons onto a lightly greased baking sheet. The biscuits will not expand much as they cook, so make them as big as you'd like them to be when you eat them. 
  5. Bake 8-12 minutes. Let cool and enjoy!

If you like this recipe, please feel free to CLICK one of the "Reactions" below above the comments and/or add this recipe to your Pinterest board and/or share on Facebook! Thanks!

Notes:
*I use Smart Balance Light buttery spread. Regular dairy butter or margarine can also be used. 
**I usually use plain original soy milk but have also tried unsweetened almond milk and 2% cow's milk. They all work. 

Nutrition Facts:
(per biscuit)
Cals-106, Fat-4.3g, Carb-15.7, Fiber-2g, Sugar-1.2g, Pro-2.6g


Tuesday, May 20, 2014

How I Love Thee, Healthy Chocolate Smoothie..Let Me Count the Ways!

Did someone say Summer AND smoothies?? Count me in!! I am one of those people that choose to eat foods according to the seasons and the weather. If it's hot outside, I can eat warm foods and drinks BUT I totally prefer cooler ones or at least room temperature. It is not pleasant to partake of something hot to make you even hotter in the sweltering heat.

 In walks our friend the smoothie....


I didn't grow up drinking smoothies..well except the VERY unhealthy step-cousin, half removed milkshake or a fast food version of a smoothie which is not healthy at all. My husband, who is a doctor by the way, introduced me to the deliciousness of smoothies. They are fast to make, can hide many nutritious things that picky eaters and/or children would never touch otherwise, are so delicious, and are great for on the go. What is not to like?? I'm so glad Tim introduced us. Now, we are good friends (especially in the warmer months). :)

This is my oldest boy when he was 1, and his first ever smoothie.
He's always been a highly picky eater,
and as you see here he likes my fruit and veggie smoothies!
Can you tell I was really surprised and excited??

And now that my big boy is 2.5 years old,
he still loves his smoothies..and chocolate ^__^

I plan on trying out several different flavors and focusing on different styles of smoothies over the next couple months. By styles I mean protein rich, low fat, low carb, low sugar, more veggies, more fruits, yogurt added, peanut butter added, and things added you would never even think about. I may mix and match some of these styles to come up with the most healthy, kid-friendly, and delicious cool summer perfect drinks for you.

I desire to create flavors that taste as if they should be "bad" for you but are really not! I can't help but think of the word CHOCOLATE. YUM! Now, we all know that chocolate is high in calories and fat and sometimes sugar, but if you're like me then you crave it at least once a day. So, if we can eat a Healthy Chocolate Smoothie with added fruit and veggies and with less fat, calories, and sugar then we would be stoked right?? This smoothie is really for all you parents out there who need a little stress relief, something that will put a smile on your lips, AND you could share with your kids...if you wanted to... and not have parental guilt. I'm in!!

What I love so much about this smoothie is how it soothes your chocolate cravings, but also gives you fiber, protein from oats and peanuts, iron, antioxidants and vitamin C and a decrease in blood sugar spikes from strawberries, tons and tons of nutrition in a WHOLE CUP of spinach, and of course calcium and other vitamins in milk. Please let me know what you think and if your family likes it!

*I have several tips for cheaper and healthier smoothies. Soon I am going to write a post just on ways to make healthier smoothies without going over budget. So stay tuned!


The Healthy Chocolate Smoothie
(Can be gluten free, dairy free, egg free, tree nut free, added sugar free, Vegan, Vegetarian)
Makes 1 serving (A little over 1 cup)

Ingredients
  • 1/2 cup sliced frozen strawberries*
  • 2 tbs oats (I use Old Fashioned Oats, but Quick Oats would also work.)
  • 1 tbs unsweetened cocoa powder
  • 2 tbs PB2** (or 2 tbs peanut butter) (I added this mostly for protein not flavor.)
  • 1 cup unsweetened milk*** (I use Almond or Almond/Coconut milk)
  • 1 cup fresh spinach
  • Sweetener of choice to desired sweetness**** (I use 2g Splenda or Stevia (2 packets). Other options are 4 tsp Sugar or 1-2 tbs honey, ect.)
  • Crushed ice if not using frozen strawberries*
Directions
  1. Place all ingredients into blender in the order shown except for the sweetener and ice if using.
  2. The next step all depends on what quality of blender you own. I have a very old blender with several options, but it takes a while to get everything blended down and blended together. 
  3. With my blender I first use the "Ice Breaker" button, then the "Puree" button, and lastly the "Blend" button. The whole process may take about 5 minutes, and I check on the consistency occasionally to see how much longer it needs to blend. If you have something very powerful, like a Vitamix, then this step should be much quicker and easier for you. 
  4. Add ice if you didn't use frozen strawberries and blend more until all ice is crushed and blended in.
  5. Taste the smoothie to see if you like the thickness and the taste. If it is not thick enough, then add more ice and continue to blend. 
  6. If you prefer a sweeter smoothie (I DO!) then add your choice of sweetener and blend for 20-30 seconds. Taste again and add more sweetener if desired.
  7. Drink and Enjoy (and hide if you don't want to share)! 
Oops! Iot a little excited, and after I tasted it I couldn't stop!

If you like this recipe, please feel free to CLICK one of the "Reactions" below above the comments and/or add this recipe to your Pinterest board and/or share on Facebook! Thanks!

Notes:
*I buy fresh strawberries, cut them, and put them in the freezer for later use. You can also buy a huge bag of frozen cut strawberries at Sam's for a GREAT price. When I'm short on time, I buy those. If you don't have frozen strawberries, but you have fresh ones then just make sure to add ice to help thicken it.
**PB2 is an amazing food invention. I am in love. All it is is pressed peanuts that are ground into powder with a tiny bit of added salt and sugar. It has only 45 cals, 1.5g fat, 5g carbs, and 5g protein per 2 tbs. I like to add this to my food for extra protein and flavor.

If  you decide to use peanut butter instead of the PB2 to increase the protein count then you can, but it will also increase the fat and calories tremendously. The PB2 doesn't add much of a taste to this smoothie, so you can also just leave it out. 
***My son and I can not have cow's milk. I prefer to use the unsweetened almond or almond/coconut milk. If I am making a smoothie for my son, I use the original flavor soy milk and usually do not need to add sweetener to it or I may use a half of a banana or some honey. For my husband, I would use 2% cow's milk. We have TONS of milk in our fridge HA! 
****Since I am watching my sugar intake, I use Splenda or Stevia to add sweetness to my smoothies. My husband prefers to just use sugar or honey. As I mentioned earlier, I usually add half a banana or honey to my son's smoothies if needed. 

Nutrition Facts:
(for the whole recipe)
Cals-169, Fat-6g, Carb-25g, Sugar-3g, Pro-9.7g

Thursday, May 15, 2014

Protein Packed, Low Carb, Fast and Easy Egg Wrapped Cups

Ever since I had Gestational Diabetes with my first child, I switched over to a more balanced way of eating. I have always CRAVED carbs. I heart them. :) The problem is that my body does not heart them, and when I eat too many carbs I gain weight very quickly (unless I'm running 50 miles a week like I did in college), get hypoglycemia, headaches, and apparently Gestational Diabetes when pregnant. Not cool.

The nutritionist I had to see throughout my whole pregnancy told me how to eat a more balanced diet to control my blood sugar with diet and not need medication. It worked like a charm. Of course we need SOME carbs to survive, and I still eat them but in moderation. These nifty Egg Wrapped Cups are the perfect snack or breakfast for anyone desiring to follow a lower carb way of eating, are gluten-free, eat paleo, or just like eggs. PLUS, they are delicious. I don't even like egg yolks that much, but these cups are addictive.


I found the original recipe here. It's one of the easiest recipes ever made. Even the most inexperienced cook can make these. I also think they are quite pretty. Isn't that bright yellow yolk a beautiful sight??

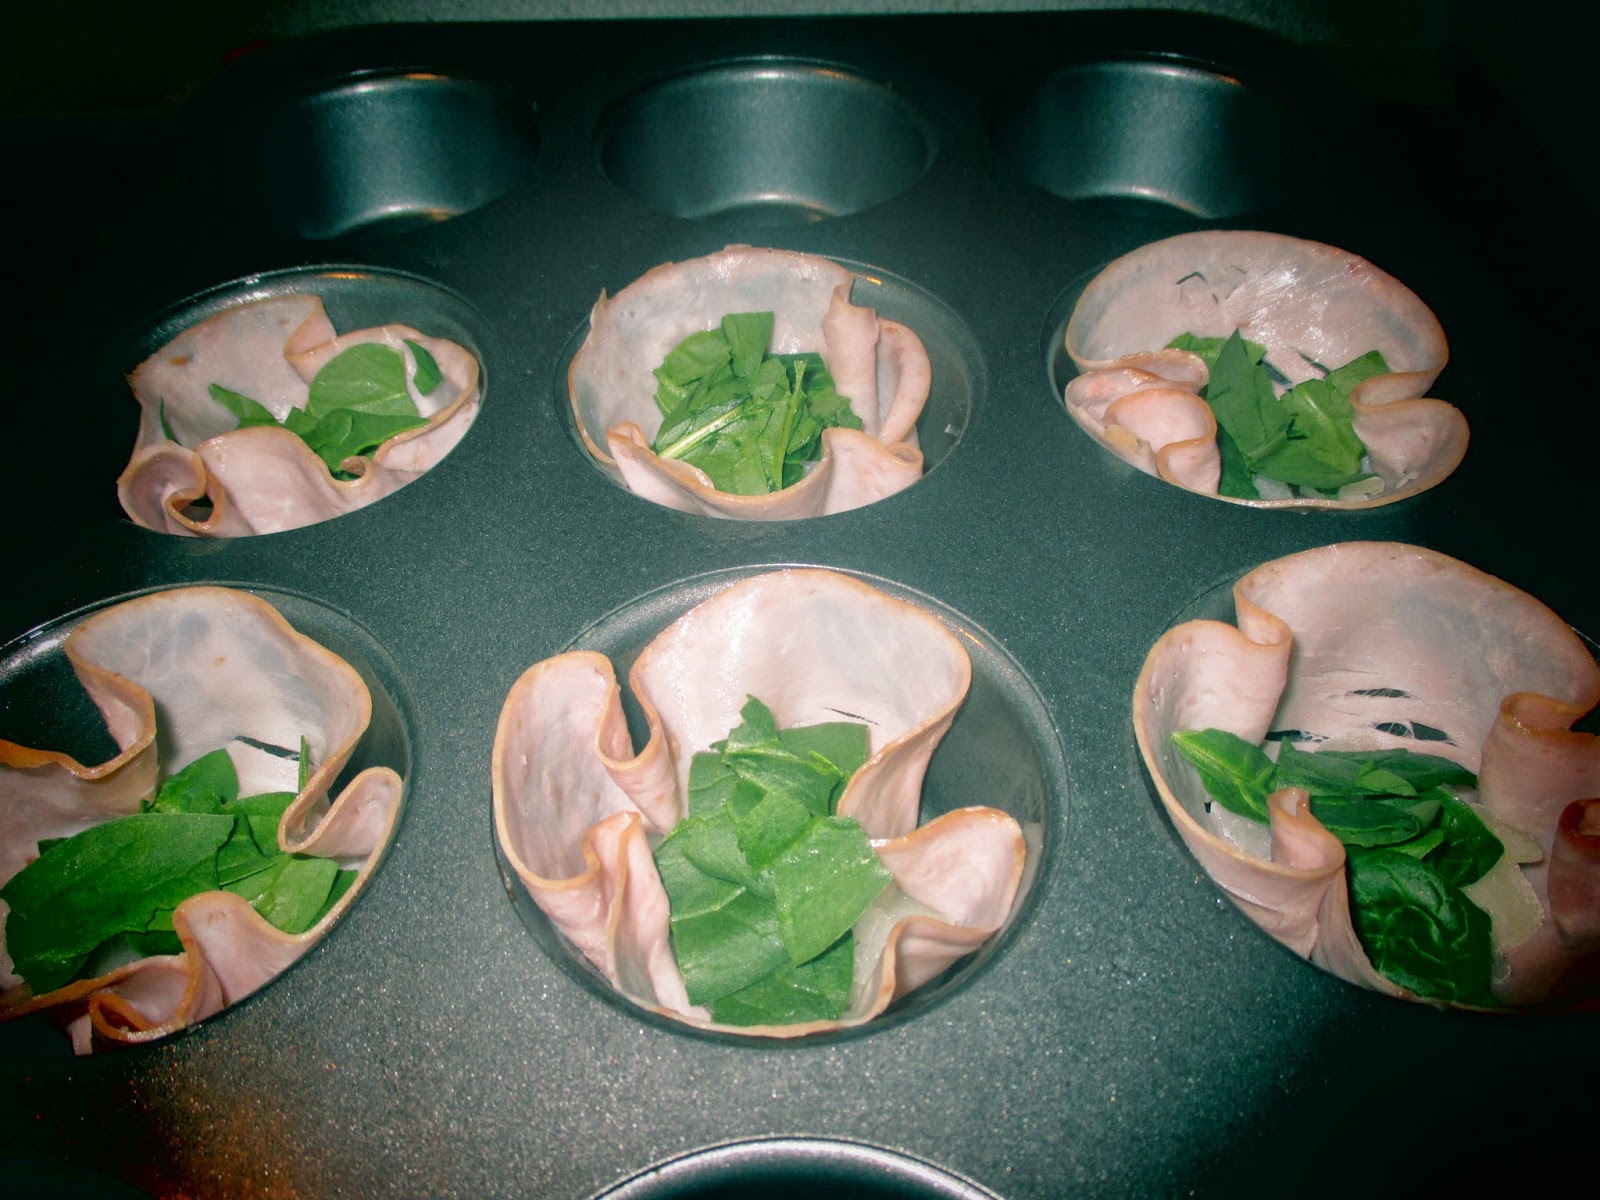
First, spray a muffin pan and place ham (chicken also works) lunch meat into the cups.
Place 1-2 tbs chopped onions in the meat.
Shred some fresh spinach and place on top of onions.

Crack an egg for each cup and drop onto the spinach.
On the left 2, I sprinkled some Italian seasoning.
On the right 4, I tried paprika and black pepper. Both were great!

After I adapted a lowER carb diet during my pregnancy, I continued to keep the same diet after I had my baby. Great news is that when I got pregnant again I did NOT have Gestational Diabetes. I truly believe this had a lot to do with how I changed my eating habits. It works guys! I'm not trying to convert you...just telling my story. Enjoy these Egg Wrapped Cups and keep those blood sugars balanced and your body not crashing as an added plus! Make sure you keep these in a container in the fridge and eat them cold or heat them up in the microwave or oven when ready to eat. They were still good after 3 days in our house...they've never made it longer than that. Ha!

Fast and Easy Egg Wrapped Cups
(Can be gluten free, milk free, nut free, refined sugar free, low carb, Paleo, high protein)
Makes as many servings as you desire. You can make 1 or 12 or 24! This recipe is for 6. 

Ingredients
  • 6 slices of thin lunch meat (ham, chicken, or turkey will work)*
  • 1 tbs diced onions for each Egg Cup (6 tbs total)**
  • 2 tbs fresh spinach leaves shredded per Egg Cup (12 leaves total)**
  • 6 eggs
  • Any spices prefered (I used Italian seasoning, paprika, and black pepper)
  • Spray cooking oil

Directions
  1. Preheat oven to 375 degrees F.
  2. Spray muffin tins with cooking oil.
  3. Place 1 slice of lunch meat in each sprayed cup.
  4. Put 1 tbs onions in cup and 2 tbs shredded spinach leaves on top of onions.
  5. Crack an egg on top of the spinach and season with desired spices.
  6. Bake for 20 minutes or until yolk is cooked and set.
  7. Allow to cool for a couple minutes and enjoy!
If you like this recipe, please feel free to CLICK one of the "Reactions" below above the comments and/or add this recipe to your Pinterest board and/or share on Facebook! Thanks :) 

Caution: Juice will leak out of the cups while you eat them. If they do not cool enough, the juice could possibly burn you. Make sure to let them cool thoroughly. Also be sure to eat over a plate (or in a sandwich bag if on the go) to prevent a mess...and a need to change your clothes ;)


Notes:
*I use very thin slices of meat from Kroger. I use this brand (Kroger Deli Style Lean Smoked Ham) to come up with the Nutrition Facts. Each slice has 12 calories.
**Be creative and try other vegetables! I think green peppers, red peppers, carrots, etc. could work nicely. I used frozen already chopped onions for this recipe. Huge time saver, AND my body hates cutting onions. Not a pretty sight!

Nutrition Facts:
(per Egg Cup)
Cals-90, Fat-5.5g, Carb-2g, Sugar-0g, Pro-8.1g


Sunday, May 11, 2014

An American Family Favorite Transformed: Healthier Veggie Turkey Spaghetti

My husband, Tim, is a man who loves food! I am such a lucky girl because he not only willingly tries all of my new food inventions, but also all the traditional favorites make his tummy happy. With an Asian descent but growing up in America, he has eaten everything and doesn't mind a bit! Whew! Made my early days of learning how to cook MUCH less stressful. Thanks honey!


One of Tim's favorite dishes to make as a bachelor was spaghetti. He still gets excited when I make it. Maybe it brings back fond memories of those younger years or maybe he just really loves how I make it....maybe both. When we first got married way back when, I did not know how to cook. I could heat up a few things and use the microwave like a champ, but it far from being a healthy chef by any means. As a new wife, I was so frustrated I could not cook delicious food for my husband so I made myself a promise that I WOULD learn how to cook. Over the last 6 years I have worked hard not only to learn how to cook food, but to make it healthier while also making the taster smile. There is just something magical about making a dish that makes someone go "Mmmmm" as they take bite after bite. That is what this spaghetti does.

Everyone who tries my special spaghetti is a little apprehensive at first. They think..zucchini in spaghetti?? Many of them have only eaten spaghetti one way: tomato sauce, noodles, sprinkle parmesan cheese. Sure there's nothing wrong with that, but why not make it SO MUCH better for you?? It can taste even more yummy, and you have the pleasure of knowing that you are feeding your family and friends with the healthiest spaghetti recipe you have! Pretty sweet deal.

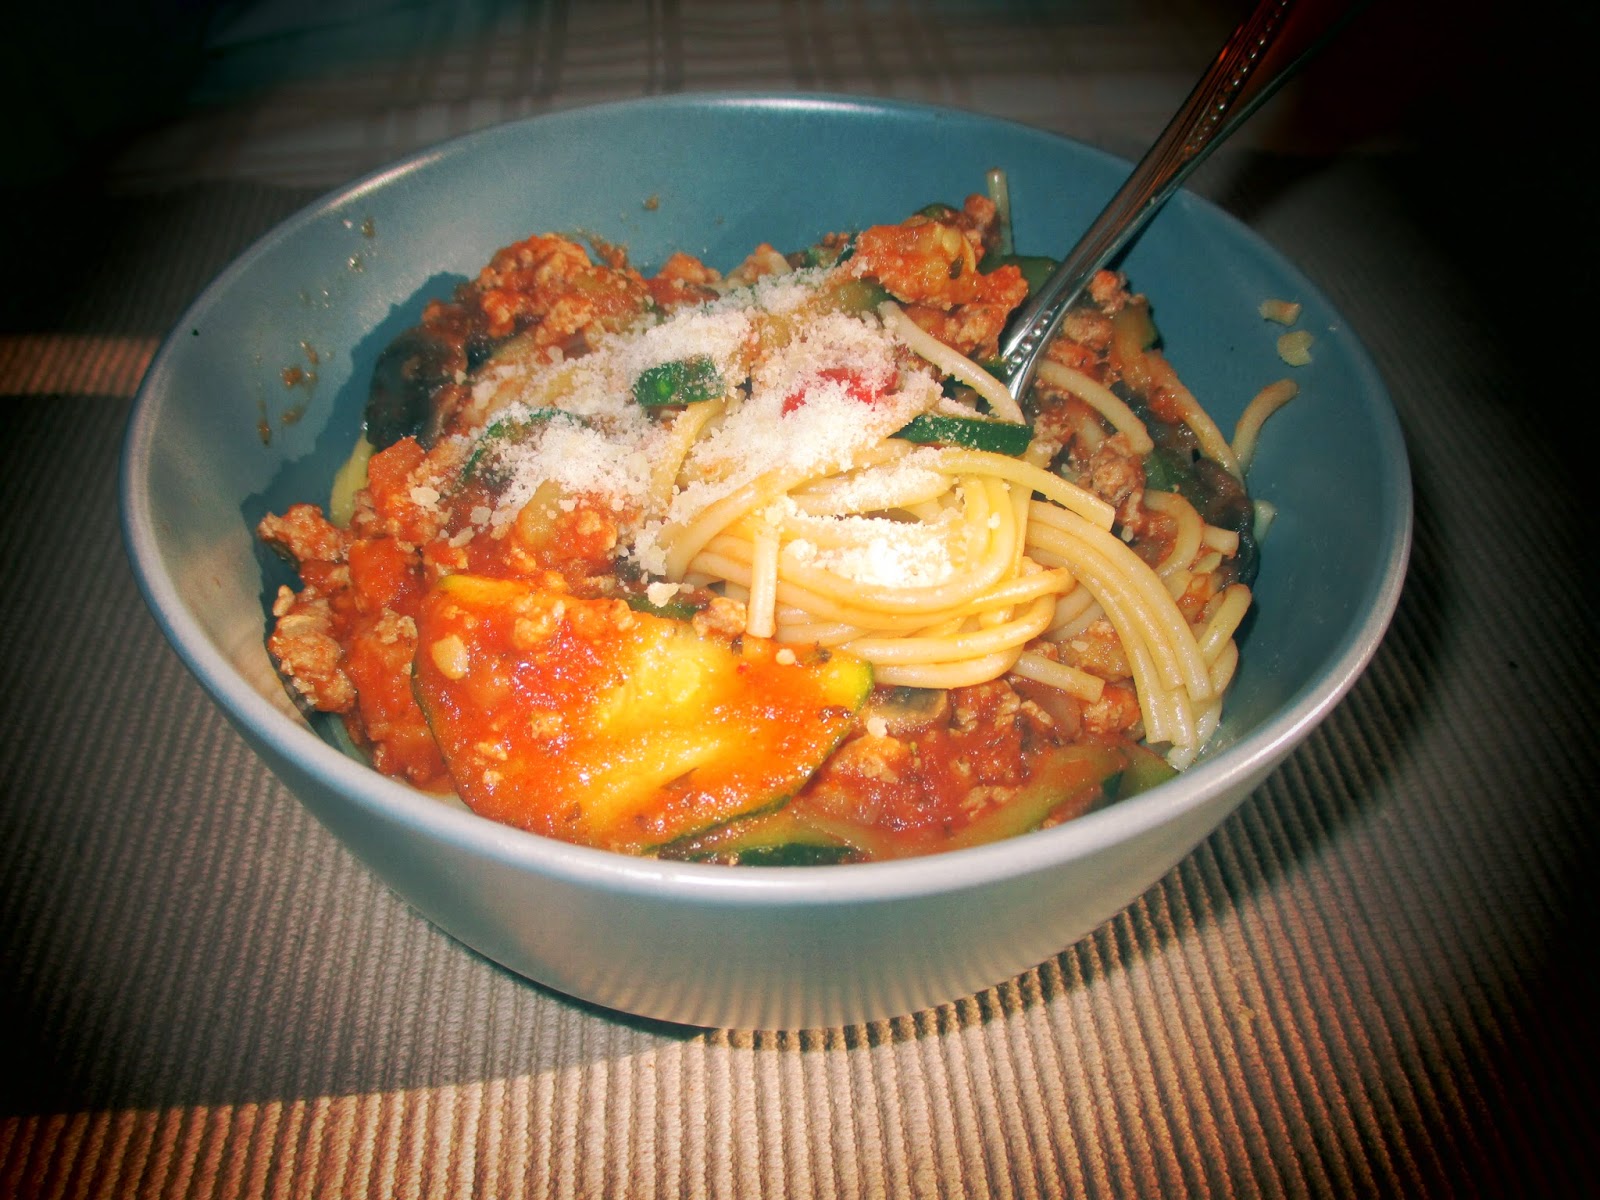
Mushrooms, zucchini, onions, and three kinds of peppers bring
tons of nutrients and vitamins to this dish

Apart from the health benefits of tomato sauce (did you know tomatoes are the most nutritious and good for you when cooked?), there is a large variety of vegetables and lean ground turkey added. If you're into whole wheat pasta you could throw that in there too, but my family kind of draws the line at that point. I sometimes also make my tomato sauce from scratch, but I generally don't have enough time and buy the No Sugar Added Hunt's Pasta Sauce at Kroger. It keeps the carbohydrate and sugar content low but does not skimp on taste. These pictures make me what to make this again..soon..maybe next week??


For those of you who are Vegan or Vegetarian, you can easily omit the ground turkey meat and still be left with a tasty and healthy sauce or if you prefer a lower carb meal you can keep your noodles and sauce separate like we do at my house. Then everyone can add as many noodles or as much sauce as they want. I always want more sauce...my husband and son like more noodles. :)


Healthier Veggie Turkey Spaghetti
(Can be gluten free, dairy free, egg free, nut free, Vegan, Vegetarian)
Serves 6

Ingredients
  • 1 pound of noodles (gluten free or wheat or whole wheat)
  • 1/4 cup chicken broth
  • 1 pound lean ground turkey (7%)
  • Italian seasoning
  • 1 tsp olive oil (for vegetables) + 1 tbs olive oil (for noodles)
  • 2 zucchinis, sliced
  • 2 cups mushrooms, sliced 
  • 1 cups peppers, chopped (red, green, and yellow)*
  • 1 cup white onion, chopped*
  • 1 24 ounce can Hunt's No Added Sugar Pasta Sauce or 2 1/2 cups of any tomato sauce
  • Powdered cheese or nutritional yeast (optional)**

Directions
  1. Bring 4 quarts of water to a boil. 
  2. While the water is coming to a boil, pour the chicken broth into a separate pot and cook the ground turkey on med-high heat with the italian seasoning until done. 
  3. When meat is done, place on a plate covered with paper towels to soak up the extra fat. 
  4. By this time the water should be boiling, add the noodles and cook as directed.
  5. Pour out any leftover juice from pot and add 1 tsp olive oil. Add half of the zucchini, mushrooms, peppers, and onions. Stir occasionally on med-high heat. After a few minutes of cooking, add the other half and continue cooking until all is softened and finished.
  6. Add the turkey into the vegetables and stir together on medium heat. 
  7. Pour in the pasta sauce and stir until warm. 
  8. Drain the noodles, add 1 tbs. of olive oil, and stir to keep the noodles from sticking.
  9. If prefered combine noodles and sauce mixture or leave separate and serve.
  10. Add powdered cheese or nutritional yeast to individual bowls if desired.


If you like this recipe, please feel free to CLICK one of the "Reactions" below above the comments and/or add this recipe to your Pinterest board and/or share on Facebook! Thanks :)

Notes:
*To reduce prep time I buy the peppers and onions already chopped and frozen. They are just as nutritious and make this dish much easier. Feel free to use fresh and chop them yourself. 
**Nutritional Yeast is a dairy free option to powdered cheese. I use the Bragg brand which can be bought at Kroger and many other chain grocery stores or health food stores. 

Bon Appetit! 


Tuesday, May 6, 2014

Healthy Melt in Your Mouth Chocolatey Muffins

About 8 months ago I found a recipe for Healthy Chocolate Cake here. The first time I made it I thought "These are really good", but I did not want to make the suggested chocolate frosting (if you have young children, you understand why). It's a really good cake, but without the frosting it is not as exciting as the original creator had intended. I decided it was time to improvise a bit and come up with something tasty to satisfy my chocolate cravings but be kid-friendly at the same time. Over the months I have tweaked the former recipe and have ended up with these Healthy Melt in Your Mouth Chocolatey Muffins. You will NOT be disappointed! Trust me.


These mini muffins are the perfect size for tiny hands, and the addition of chocolate chips keeps anyone from wondering where the frosting went. Because of how healthy and delicious these are, they are an excellent substitution to fat and calorie laden desserts even if you eat 3 or 4 at a time. 


These are soft and full of melty chocolate when served warm, but eating them at room temperature keeps the mess at bay while still making everyone happy. My toddler loves these as much as I do...we may just inhale 48 of these mini muffins within 3 days. Which is good since that's how long I'd leave them sitting on the counter before moving them into the fridge. They will last for about 7 days in the fridge and in the freezer for 3 months. These freeze great. When you are ready to eat them, just thaw them in the fridge overnight and pull them right out of the fridge and into your mouth OR pop them in the microwave for 20-30 seconds for a nice warm treat. Caution: you can't eat just one.


Healthy Melt in Your Mouth Chocolatey Muffins
(Can be Gluten free, dairy free, egg free, nut free, refined sugar free, Vegan, Vegetarian, low sugar)
Makes 48 mini muffins or 24 medium size muffins

Ingredients (my list of ingredients make a double batch compared to the original recipe)
  • 1 1/2 cups Gluten-free all-purpose flour (or all-purpose wheat flour if gluten is not a problem)
  • 2/3 cup cocoa powder
  • 4 tsp baking powder
  • 1 tsp baking soda
  • 2 cups unsweetened applesauce 
  • 1/3 cup of Splenda, Stevia, or Sugar*
  • 1 tbs vanilla flavoring
  • 1/3 cup chocolate chips (dairy free)*
  • Spray canola oil**
Directions
  1. Spray two mini muffin pans with the canola oil.
  2. In a large bowl combine the flour, cocoa, baking powder, and baking soda.
  3. In another bowl combine the applesauce, Splenda, and vanilla.
  4. Pour the wet ingredients into the dry and stir until fully mixed together.
  5. If the mixture is not a thick cake-like consistency add a bit of milk (soy, almond, or cow) or water to the mix and stir.
  6. Add 1/3 cup of chocolate chips to the bowl and fold in. 
  7. Turn your oven onto 180 degree C or 350 degrees F. (I turn my oven on here to save electricity and from keeping my house from getting too hot in the summer.)
  8. Pour the mixture into the muffin pans.
  9. Bake for about 10 minutes. Since ovens cook differently, check them at 8 minutes to make sure they don't burn.

This is how your mixture should look before adding the chocolate chips.

Fill up the cups 2/3 of the way to get 48 mini muffins.
They may seem a little small at first because of how big
America's portion sizes have become, but eating 3 of these
will leave you very satisfied!

Make sure you let them cool before you bite into one.
I know it's hard, but the wait is worth it :)

If you like this recipe, please feel free to CLICK one of the "Reactions" below above the comments and/or add this recipe to your Pinterest board and/or share on Facebook! Thanks :)

Notes:
*I prefer to use Splenda or Stevia, but for those of you that prefer to use sugar please do. It will not alter the recipe and will be just as delicious! If you don't want to add the chocolate chips, do 1/3 cups of sweetener in their place. This would give you a total of 2/3 cup of sweetener. 
**You can use any oil or butter in place of the spray oil to grease your pan.

Nutrition Facts:
(per mini muffin with chocolate chips and splenda)
Cals-29, Fat-0.7g, Carb-6g, Fiber-0.4g, Sugar- 1g, Pro-0.7g


Thursday, May 1, 2014

No Hassle Crock Pot Salsa Veggie Chicken

I absolutely love Pinterest. Ok... maybe I'm going a little overboard with the "love", but I sure can't help but be thankful for the invention of the website that gives me idea upon idea for new meals/foods to make for my family and friends! Before Pinterest it took me hours to plan my meals for the week by searching for recipes that fit my dietary needs with search engines, my bookshelf full of cookbooks, and through word of mouth. It still takes some time and I do use my cookbooks and search engines occasionally, but the amount of time it takes is definitely less and the number of recipes I have sitting around waiting for me to make has greatly increased! Now I am even more excited to get into the kitchen and try out all of these delicious looking recipes.

Yesterday I made one of those "Thank You Lord for such a great and easy recipe" pins. I was so pleased with the outcome. It was delightful to the taste buds and took me no more than 10 minutes to prepare. The original recipe has only 3 ingredients, but I enjoy vegetables WAY too much to stop there. The addition of mushrooms, corn, onions, and tomatoes was needed. This made the meal even more healthy and refreshing. Vegetables always make me feel more full and satisfied without being weighed down. I got the "okay" from the original chef to post my version of her recipe. You can find the original recipe here and also on my Pinterest page.

While this was cooking, I was doing more important things...like cuddling with my babies :)

Another thing that is great about this recipe is that it is never-ending. OK..so it will end eventually..maybe. We have had "this" meal twice already and will have it again for dinner tonight. There was so much sauce left but not many vegetables or meat, and you do not throw this tasty sauce away. I think I would cry. But seriously. Last night before we went to bed I added a different kind of meat, more vegetables, and a can of diced tomatoes and voila! Plug in the rice cooker an hour before lunch, and lunch was served at noon. While I was NOT cooking I was building a fort with my 2.5 year old, snuggling with my baby boy, and watching Veggie Tales (not in that order). My husband loved the lunch so much he asked if we could have it again tonight for dinner. HA! REALLY?? OK! :) So, I added more meat, different vegetables this time, and some homemade chicken broth. Turned on the crock pot and DONE. Tonight we will have a similar but almost like new dish that I once again will not be slaving over before dinner (leftover rice here we come!). You can also omit the meat, add more beans and vegetables, and create a vegetarian version of this dish.

The meat was so tender that it falls to pieces. Cut the chicken?
No thanks. It does it for you. :)

There are so many different ways that you can make this dish to suit your family's needs. Once you make the main portion of this meal in the crock pot, the options are limitless as to how you can eat it. I prefer to have a Salsa Chicken Salad. My husband likes rice with EVERYTHING. The good news is that not much extra work needs to be done once the meal is cooked. Make sure you have all your favorite taco type topping available so each person can make their own delicious finished masterpiece. I will give you some ideas, and why don't you see what amazing dishes you can come up with? Afterwards, please share with me a picture or description of how it turns out! I'd love to hear about it.

My favorite way to enjoy this meal is on a bed of spinach with Vegan sour cream on top. YUM!

No Hassle Crock Pot Salsa Veggie Chicken
(Can be gluten free, dairy free, nut free, egg free, Vegan, Vegetarian, refined sugar free, low carb)
Makes several servings. Can feed at least 4 people.

Ingredients
  • Chicken or Vegetable broth
  • Fresh mushrooms, about 8-10 or 1 cup chopped*
  • 2 cups of fresh or frozen chopped onions*
  • 1 1/2-2 lbs. boneless, skinless chicken breast or thighs, ground turkey, or omit for vegetarian**
  • One 16 ounce jar of your favorite salsa (mild, medium, or hot)
  • 2 cups frozen or canned corn (drain and rinse if canned)*
  • One 14.5 ounce can of diced tomatoes, drained*
  • One can of black beans, drained and rinsed
  • Taco fixings - tortillas, rice, tortilla chips, spinach or lettuce, tomatoes, sour cream, guacamole, cheese, etc.
  • Spray oil
Directions
  1. Spray crock pot with spray oil. I always do this to prevent any possible sticking or extra mess to clean.
  2. Pour the broth of your choice to cover the bottom of the crock pot. I do this to prevent the chicken from becoming dried out if using chicken breasts and to make more tasty sauce.
  3. Chop your mushrooms and onion if bought whole, and place them in the crock pot.
  4. Put meat of choice on top of the vegetables. This will cause the vegetables to soak in all the juice and be full of flavor.
  5. Pour beans, corn, and tomatoes on top to cover the chicken. 
  6. Pour salsa over the whole meal. 
  7. Cook on low for 6-8 hours or on high for 3-4 hours. 
  8. Do something fantastic with all your extra time.
  9. Serve with your favorite fixings and enjoy!

This dish makes me happy.

This dish made my husband ask for more!
If you like this recipe, please feel free to CLICK one of the "Reactions" below above the comments and/or add this recipe to your Pinterest board and/or share on Facebook! Thanks :)

Notes:
*These are the vegetables I chose to use because I know my families enjoys them. You can choose to use these vegetables or add your own favorite taco style veggies. Fresh or frozen or canned will work great for this recipe. It all depends on how much work you want to put into the prep work. If using canned vegetables, make sure you rinse and drain them before adding to the crock pot. Omit corn and eat as a salad if you want a low carb meal.
**I used chicken breasts the first time I made this dish. The second time I used ground turkey 7% fat and chicken thighs. Both ways were absolutely delicious and filling. You can also omit the meat all together if you want a Vegan or Vegetarian meal and add more beans and vegetables. If you try tofu, let me know how it turns out as I have no tried that yet.

Nutrition Facts: 
Due to the variety of vegetables, meat, sauce, and well everything, I am unable to give you this information.