Sunday, June 15, 2014

PB and Chocolate Chip Oatmeal Bliss for Adults (Part 1)

I don't know if you see a trend going on here or not, but if you didn't realize it yet I really really like chocolate and peanut butter is a very close second. I have also been coming up with a lot of delicious and healthy breakfast meals per request of some friends. After posting a few of my smoothies, some have mentioned they need something more solid to fill them up. That is when I decided to share some ways to make one of my favorite breakfast meals: oatmeal.

Lately I have not been sleeping well due to a teething and sick baby. When I am tired, I NEED FOOD. It's like my body goes into starvation mode and keeps sending signals to my brain that I MUST EAT NOW. I try my very best to satisfy those cravings while at the same time keeping it healthy and simple. This recipe is one way I accomplish that.


I have three versions of this delicious meal for you. 1) PB and Chocolate Chip Oatmeal Bliss for Adults 2) PB and Chocolate Chip Oatmeal Bliss for Children 3) PB and Chocolate Chip Oatmeal Bliss Light. I will also share a good side to go along with this meal if you prefer more protein with your breakfast.

The Adult version has the most oats, chocolate chips, and peanut butter. I will share this one with you today.
The Child version has the same ingredients but less amounts of each. I will be posting this one very soon!


The Light version uses PB2 instead of the creamy peanut butter. I will also be posting this one very soon!


I will go into more details (trust me it is NOT complicated at all!) about how to make the first type of oatmeal in the recipe down below, but here is an easy side that you can make if you want to add more vegetables and protein to your meal.

1/3 cup of egg whites, 2 tbs diced onions, and 1/2 cup spinach (or any
vegetable on hand. Peppers and mushrooms would also work well.), and
1 tsp of olive oil scrambled in a skillet. Sprinkle in some Italian
Seasoning for added flavor. (117 cals, 5g Fat, 6g Carbs, 12g Pro)

Now..how about that sweet satisfying blissful oatmeal...

PB and Chocolate Chip Oatmeal Bliss (for adults)
(Can be gluten free, dairy free, tree nut free, egg free, Vegan, Vegetarian)
Serves 1 (double recipe for 2)

Ingredients
  • 1/3-1/2 cup of old fashioned oatmeal not cooked (depends on how hungry you are)
  • 8 dairy free chocolate chips (You can add as many as you want. Sometimes I do up to 12 chips.)
  • 1 tablespoon creamy natural peanut butter (or any nut butter you prefer)

Directions for Microwave 
(This method is quicker and easier if cooking for one person.)
  1. Put oatmeal in a large microwave safe bowl. Pour in double the amount of water into the bowl. Example: 1/3 cup of oatmeal and 2/3 cup of water.  
  2. Cook in microwave for 2-3 minutes until the oats are soft and no water is visible. DO NOT COVER THE BOWL. (My microwave is VERY powerful and it only takes 2 minutes. The oatmeal container suggests up to 3 minutes, so I would try 2 minutes and if it's still watery cook for 1 more minute.) 
  3. Be careful taking the bowl out of the microwave as it will be very hot. 
  4. Put the peanut butter into the oatmeal and stir until mixed.
  5. Drop the 8 chocolate chips into the bowl and stir. These will melt into the hot oatmeal. 
  6. Wait a couple of minutes for it to cool and then enjoy! 

    Directions for Stove
    (This way will be much easier if cooking for more than one person. These directions are for 2 servings of 1/2 cup of dry oats each.)
    1. Boil 1 3/4 cups of water in a pot on the stove. 
    2. Stir in 1 cup of oats. 
    3. Cook for about 5 minutes over medium heat; stir occasionally.
    4. Once done, put half of the oatmeal into one bowl and the other half into another bowl. 
    5. Put 1 tablespoon peanut butter into each bowl and stir until mixed. 
    6. Drop 8 chocolate chips into each bowl and stir.
    7. Wait a couple of minutes for it to cool and then enjoy! 


    Nutrition Facts:
    (1 serving made with 1/3 cup of dry oatmeal)
    Cals-250, Fat-12g, Carbs-27g, Fiber-3g, Sugar-4.5g , Pro-7.5g

    (1 serving made with 1/2 cup of dry oatmeal)
    Cals-300, Fat-13g, Carbs-36g, Fiber-4g, Sugar-4.5g, Pro-9.5g


    Sunday, June 8, 2014

    Moist Chocolate & Coconut Flour Treats

    I've been on a mission, guys! I know that several of you are eating low carb, and I even had someone specifically ask me if I could come up with an even LOWER carb muffin than my Healthy Chocolate Muffins I posted a month ago. I have been wracking my brain in the kitchen for the past couple weeks and cooked 5 pans of muffins in the past 2 days alone (I was SO CLOSE to the perfect recipe and could NOT stop until I got it down!). These beauties still have some carbs, but only have HALF the amount of the previous muffins: 2.8g carb with 1g of that being fiber!


    If you have ever cooked with coconut flour, which is the gem to these Moist Chocolate & Coconut Flour Treats, then you KNOW how sensitive it is. It is no joke. PLEASE do not change ANYTHING to this recipe. You have to make it exactly as I post it or you will not like the results. It may still taste fantastic, but you may have a gooey but crumbly situation (SOOO weird I know!).

    If you do not like coconut have no fear! These taste nothing like coconut and especially not like the coconut you are probably thinking of. The words out of my husband's mouth were (and I quote), "These are good! No coconut flavor, not bitter from the cocoa, moist, and reminds me of a chocolate brownie!" SCORE!

    Once you cook these, make sure you let them completely cool and then stick them in a covered container and in the fridge. It's just way too hot to keep them on the counter during the summer. When they are cold, the fudgey chocolate flavor also comes out a lot more. YUMMM. I would go get one right now to eat, but..ummm..they're already all gone! *gasp*


    Moist Chocolate Coconut Flour Treats
    (Gluten free, dairy free, Vegetarian, low carb, low sugar)
    Makes 24 mini muffins

    Ingredients
    • 1/3 cup coconut flour* 
    • 1/4 c cocoa powder, unsweetened
    • 2 tsp baking powder
    • 2 eggs
    • 1 cup applesauce, unsweetened
    • 1/4 c splenda**
    • 1 tbs vanilla flavoring

    Directions
    1. Put the coconut flour, cocoa powder, and baking powder into a large bowl and mix very well.
    2. Place the eggs, applesauce, splenda, and vanilla into another medium size bowl and stir until blended. 
    3. Pour the wet ingredients (the ingredients from step 2) into the dry ingredients and stir until just blended. Do not over blend but make sure no chunks are left. It should be moist and slightly thick not runny. 
    4. Spray cooking oil into mini muffin pan cups or rub with a paper towel and butter or oil. Just make sure you coat the entire cup on all sides and the bottom as the muffins will stick if not covered well.
    5. Turn on oven to 400F degrees.
    6. Use a spoon and fill cups 3/4 full with the mixture. 
    7. Cook in the oven for 9-11 minutes. It took mine 11 minutes, but since ovens can differ in strength please check them at 8 minutes. If they are firm on the top and browning around the edges then they are done. If not and still pretty springy, then leave them in the oven for 2 more minutes. Check again and if they are not done cook for 1 more minute.
    8. Take muffins out and let them COMPLETELY cool before taking them out (using a knife to help works best) and placing in a container to go in the fridge.
    9. You can eat them warm, but the flavor is much stronger when cold. I suggest waiting a little bit, but if you can't wait feel free to eat them warm! They are still good :)
    If you like this recipe, please feel free to CLICK one of the "Reactions" below above the comments, leave a comment, add this recipe to your Pinterest board, and share on Facebook! Thanks :)

    NOTES:
    *I use Coconut Secret Raw Coconut Flour. I haven't tried any other brand, but please let me know which brand you use and how it turns out! I'd love to hear!
    **I have only tried Splenda in this recipe. Feel free to try Stevia or if you don't care much about the carb content substitute sugar or 1/3 cup chocolate chips in it's place.


    Nutrition Facts:
    (per mini muffin with Splenda without chocolate chips)
    Cals-20, Fat-0.7g, Chol-17.5mg, Carbs-2.8g, Fiber-1g, Sugar-0.8g, Pro-1g

    Monday, June 2, 2014

    Heavenly PB & Banana Smoothie

    I got some great feedback from my first smoothie post! Thanks to all of you that tried it and let me know what you thought. Keep that feedback coming! :) If you missed that post, you can find it here. You can find my recipe for Healthy Chocolate Smoothie there, and also the reasons why I love smoothies.


    I've been racking my brain on which amazing flavor of smoothie to come up with next. There are SO many. I was making several smoothies a day to find the most delicious taste with as many vitamins and healthy nutrients included. My waistline was BEGGING me to slow down because although smoothies are great for your body...6 or 7 within a few hours are not. Haha! Then the Heavenly PB & Banana Smoothie was born.


    Since I made this particular smoothie for my husband last night, I used 2% cow's milk but because my son and I are lactose intolerant I would have used original plain soymilk for us. Either one works perfectly well. Bananas have a lot of great nutrients in them, but they are also very sweet so when used in recipes extra sweetener is usually not needed. Just the way God intended! Flaxseeds are a good source of fiber and are rich in Omega-3s! They also contain some Omega-6 and Omega-9. Natural peanut butter is a great source of protein and has many vitamins (feel free to use any type of nut butter you choose if you have a peanut allergy in the family). I encourage the use of natural pb as it does not contain hydrogenated oils which are REALLY not good for our bodies! It is delicious, so much better for you, and much more affordable than it used to be. I generally use spinach leaves. but when I saw the kale and spinach blend was cheaper I decided to give it a whirl! It wasn't bad at all. My husband couldn't even taste the kale once the smoothie was finished (and he is NOT a bitter fan). Kale is more bitter than most other green vegetables but also extremely good for you, and when prepared correctly can be tasty to even the pickiest eaters! Lastly, the blueberries add no flavor to this smoothie, but throw in some extra antioxidants to strengthen your immune system. They do leave a tiny bit of specks after blended, so if your eaters can not stand the texture feel free to leave them out.


    Heavenly PB & Banana Smoothie
    (Can be gluten free, dairy free, added sugar free, egg free, Vegan, Vegetarian)
    Serves 2 (about 1 cup each)

    Ingredients
    • 1 1/2 cups milk (2% cow's milk or original plain soymilk)*
    • Small fresh banana, broken into 1 inch pieces (about 6-7 inches long)
    • 1 tbs ground flaxseed
    • 2 tbs peanut butter
    • 1 cup spinach or spinach and kale blend
    • 1/4 cup blueberries, fresh
    • Crushed ice, if needed to thicken (optional)
    • Protein powder (optional; not included here)**

    Directions
    1. Place all ingredients in blender in the order shown except for the ice if using.
    2. Blend as needed to completely puree and mix together all ingredients. If using a stronger blender, like a Vitamix, this step should be quick and easy. If using an older cheaper blender like me, it may take up to 5 minutes and using different settings to get the smoothie to the consistency you want. 
    3. If smoothie is not thick enough, add 1/2 cup of crushed ice and blend very well. Continue to add as much crushed ice as needed to reach the desired consistency. There should be no chunks of ice left. 
    4. Get two glasses, pour 1 cup into each, sit, sip, and enjoy!


    If you like this recipe, please feel free to CLICK one of the "Reactions" below above the comments and/or add this recipe to your Pinterest board and/or share on Facebook! Thanks!

    Notes:
    *I also tried unsweetened almond milk with this recipe, but it wasn't as tasty and needed some sweetener. If you would like to reduce the carbs and sugar in this recipe, feel free to use unsweetened almond milk and add sweetener of choice to desired flavor. I have not tried fat free, 1%, or whole cow's milk. If you do please let me know how it comes out!
    **I know many people want more protein in their breakfast or their diet in general. I actually got the idea to make protein powder optional in all my smoothies from one of my friends who really liked my first smoothie and even made it for a family member who drank it all up! She added protein powder, and I thought that it was a great idea. I did not add it in this recipe myself, but feel free to add your favorite protein powder to increase the protein amount. It will change the nutrition facts I provide below if added. 

    Nutrition Facts:
    (1 cup with 2% cow's milk)
    Cals-268, Fat-13.5g, Carbs-27.5g, Fiber-2.5g, Sugar-17g, Pro-11.5g

    (1 cup with original plain soymilk)
    Cals-251, Fat-12.8g, Carbs-25g, Fiber-3.5g, Sugar-12.5g, Pro-10.5g

    Friday, May 30, 2014

    Chewy Apple Cinnamon Cookies for Breakfast

    *edited 2/6/2015 

    After having a friend ask me for some ideas for breakfast for her children, I got really excited about experimenting and coming up with some delicious and healthy goodies for her. This is the reason I am on a breakfast kick these days :) For the past 2 days I have been in the kitchen playing with a recipe and tweaking it to come up with one of my favorite combinations: Apple and Cinnamon.

    I am a cinnamon lover. Not only does cinnamon taste great, but it has also been proven to be scientifically healthy. According to the U.S. National Library of Medicine, cinnamon is used to help treat muscle spasms, vomiting, diarrhea, infections, the common cold, and loss of appetite. It can also help to fight against bacterial and fungal infectionsfont-family: inherit;"> improve glucose and lipid levels, may help prevent Alzheimer's, and Penn State researchers revealed that diets rich in cinnamon can help reduce the body's negative responses to eating high-fat meals. (Whole article found here.)

    These chewy cookies also have applesauce and olive oil. I think we all know how good those are for you, so I'll skip that part and continue on. One of my favorite things to do as a kid was to eat the dough when my mom or grandma were cooking. Since these have no eggs in them, you can all enjoy a little cheat taste while making them without any fear of getting sick. Great plus in my opinion :)


    You only need about 15 minutes (this does not include distractions from the sweet children and/or husband and/or pets ;)) to make these from start to finish and get them on the table. Your family will be so excited when you tell them you are having cookies for breakfast! These will also make a great snack or healthy dessert. The options are limitless! Two things you need to be aware of: 1) The cookies are chewy and not hard (hence the name), so if your family does not like chewy soft foods then this recipe is not for you. 2) This recipe makes cookies with a pretty strong cinnamon taste. It's not overwhelming, but you can definitely taste it. If your consumers are not huge on cinnamon or only want a hint of cinnamon then I encourage you to reduce the amount.

    Smiling while taking a bite is not very easy.
    My little sweetie likes cinnamon as much as Mommy!


    Chewy Apple Cinnamon Cookies
    (Can be gluten free, dairy free, egg free, nut free, refined sugar free, Vegan, Vegetarian)
    Serves 8 cookies

    Ingredients
    • 1 cup + 4 Tbs. all-purpose gluten free flour ( or white wheat)
    • 1/4 tsp cream of tartar
    • 1/2 tbs cinnamon
    • 1/2 tbs baking powder
    • 1 1/2 tbs sweetener or two packets (Splenda, Stevia, or Sugar)
    • 1/2 tbs ground flaxseed 
    • 1 tbs olive oil
    • 1 cup applesauce, no sugar added/unsweetened

    Directions
    1. Place all the dry ingredients into a large mixing bowl and stir well (the first 6 ingredients). 
    2. Pour the olive oil and applesauce into the mixture and stir until completely mixed. Should not be runny.
    3. Turn oven on to 400F degrees.
    4. Drop mixture onto a lightly greased baking sheet (I use spray oil) by using a tablespoon size spoon. Each cookie will be about 2 tablespoons.
    5. Press lightly onto the cookie with the back of the spoon to make sure the cookie is not too thick or it will not cook evenly. Do not press down too much or you will make the cookie too flat and thin.
    6. Place pan into oven and bake for around 10 minutes. Check on them at 10 minutes and every minute after that until they reach a firm shape to the touch (ovens cook very differently). 
    7. Let cool and enjoy! Try with peanut butter or your favorite nut butter on top or with sausage or bacon on the side for a rounded meal. 
    Warning: These are addictive. Take care not to consume too much. :)


    If you like this recipe, please feel free to CLICK one of the "Reactions" below above the comments and/or add this recipe to your Pinterest board and/or share on Facebook! Thanks!

    Notes:
    *The flaxseeds add a lot of wonderful health benefits to this cookie. It does make the cookies slightly more chewy, so I made it optional. With or without the flax these cookies are delicious. My husband ate 3 the first night I made them! Maybe try it both ways and let me know which one you like better!

    Nutrition Facts:
    (per cookie with 1/2 tbs flaxseeds and Stevia)
    Cals-83, Fat-2.5g, Carbs-15.5g, Fiber-2g, Sugar-3g, Protein-1.7g

    Wednesday, May 28, 2014

    Easy Peasy Drop Biscuits

    If you're like me and not a chippy energetic person the moment you wake up in the morning, these biscuits are for you! I need some caffeine, time in the Bible, and food in my system before I become capable of doing anything productive. This means making breakfast for my family is the last thing on my mind when I open my eyes. For this reason we are usually pretty laid back about breakfast, but there are times I really want to make something warm and tasty for my family to enjoy. Their smiling faces as they take a bite makes it all worth it. Good thing these biscuits make for an easy peasy quick and yummy breakfast. Just add some scrambled eggs or bacon, fresh fruit, and milk on the side to make a complete balanced meal. These biscuits are not good for cutting open and placing something inside, but pour delicious gravy or chocolate gravy or spread some mouth-watering butter, jelly, or peanut butter (Nutella anyone??) on top!


    I found the original recipe here (allrecipes.com is such a great website!), but made my own alterations to make it gluten and dairy free. You will love these biscuits and even more how simple they are to make. My extremely picky 2.5 year old LOVES these with peanut butter. They even make a great snack later in the day IF you have any leftovers. Just throw them in a sealed bag and eat them within 3 days. 


    Easy Peasy Drop Biscuits
    (Can be gluten free, dairy free, nut free, egg free, refined sugar free, Vegan, Vegetarian)
    Serves 6 large biscuits (can easily double recipe to make 12)

    Ingredients
    • 1 cup all-purpose flour (gluten-free or white wheat)
    • 1/2 tbs baking powder
    • 1 packet of Splenda, Stevia, or sugar (2 tsp)
    • 1/4 tsp cream of tartar
    • 1/4 cup melted dairy free butter*
    • 1/2 cup dairy free milk**
    Directions
    1. In a large bowl, mix flour, baking powder, sweetener, and cream of tartar.
    2. Pour in butter and milk and stir.
    3. Turn oven on at 450F degrees.
    4. Drop mixture by tablespoons onto a lightly greased baking sheet. The biscuits will not expand much as they cook, so make them as big as you'd like them to be when you eat them. 
    5. Bake 8-12 minutes. Let cool and enjoy!

    If you like this recipe, please feel free to CLICK one of the "Reactions" below above the comments and/or add this recipe to your Pinterest board and/or share on Facebook! Thanks!

    Notes:
    *I use Smart Balance Light buttery spread. Regular dairy butter or margarine can also be used. 
    **I usually use plain original soy milk but have also tried unsweetened almond milk and 2% cow's milk. They all work. 

    Nutrition Facts:
    (per biscuit)
    Cals-106, Fat-4.3g, Carb-15.7, Fiber-2g, Sugar-1.2g, Pro-2.6g


    Tuesday, May 20, 2014

    How I Love Thee, Healthy Chocolate Smoothie..Let Me Count the Ways!

    Did someone say Summer AND smoothies?? Count me in!! I am one of those people that choose to eat foods according to the seasons and the weather. If it's hot outside, I can eat warm foods and drinks BUT I totally prefer cooler ones or at least room temperature. It is not pleasant to partake of something hot to make you even hotter in the sweltering heat.

     In walks our friend the smoothie....


    I didn't grow up drinking smoothies..well except the VERY unhealthy step-cousin, half removed milkshake or a fast food version of a smoothie which is not healthy at all. My husband, who is a doctor by the way, introduced me to the deliciousness of smoothies. They are fast to make, can hide many nutritious things that picky eaters and/or children would never touch otherwise, are so delicious, and are great for on the go. What is not to like?? I'm so glad Tim introduced us. Now, we are good friends (especially in the warmer months). :)

    This is my oldest boy when he was 1, and his first ever smoothie.
    He's always been a highly picky eater,
    and as you see here he likes my fruit and veggie smoothies!
    Can you tell I was really surprised and excited??

    And now that my big boy is 2.5 years old,
    he still loves his smoothies..and chocolate ^__^

    I plan on trying out several different flavors and focusing on different styles of smoothies over the next couple months. By styles I mean protein rich, low fat, low carb, low sugar, more veggies, more fruits, yogurt added, peanut butter added, and things added you would never even think about. I may mix and match some of these styles to come up with the most healthy, kid-friendly, and delicious cool summer perfect drinks for you.

    I desire to create flavors that taste as if they should be "bad" for you but are really not! I can't help but think of the word CHOCOLATE. YUM! Now, we all know that chocolate is high in calories and fat and sometimes sugar, but if you're like me then you crave it at least once a day. So, if we can eat a Healthy Chocolate Smoothie with added fruit and veggies and with less fat, calories, and sugar then we would be stoked right?? This smoothie is really for all you parents out there who need a little stress relief, something that will put a smile on your lips, AND you could share with your kids...if you wanted to... and not have parental guilt. I'm in!!

    What I love so much about this smoothie is how it soothes your chocolate cravings, but also gives you fiber, protein from oats and peanuts, iron, antioxidants and vitamin C and a decrease in blood sugar spikes from strawberries, tons and tons of nutrition in a WHOLE CUP of spinach, and of course calcium and other vitamins in milk. Please let me know what you think and if your family likes it!

    *I have several tips for cheaper and healthier smoothies. Soon I am going to write a post just on ways to make healthier smoothies without going over budget. So stay tuned!


    The Healthy Chocolate Smoothie
    (Can be gluten free, dairy free, egg free, tree nut free, added sugar free, Vegan, Vegetarian)
    Makes 1 serving (A little over 1 cup)

    Ingredients
    • 1/2 cup sliced frozen strawberries*
    • 2 tbs oats (I use Old Fashioned Oats, but Quick Oats would also work.)
    • 1 tbs unsweetened cocoa powder
    • 2 tbs PB2** (or 2 tbs peanut butter) (I added this mostly for protein not flavor.)
    • 1 cup unsweetened milk*** (I use Almond or Almond/Coconut milk)
    • 1 cup fresh spinach
    • Sweetener of choice to desired sweetness**** (I use 2g Splenda or Stevia (2 packets). Other options are 4 tsp Sugar or 1-2 tbs honey, ect.)
    • Crushed ice if not using frozen strawberries*
    Directions
    1. Place all ingredients into blender in the order shown except for the sweetener and ice if using.
    2. The next step all depends on what quality of blender you own. I have a very old blender with several options, but it takes a while to get everything blended down and blended together. 
    3. With my blender I first use the "Ice Breaker" button, then the "Puree" button, and lastly the "Blend" button. The whole process may take about 5 minutes, and I check on the consistency occasionally to see how much longer it needs to blend. If you have something very powerful, like a Vitamix, then this step should be much quicker and easier for you. 
    4. Add ice if you didn't use frozen strawberries and blend more until all ice is crushed and blended in.
    5. Taste the smoothie to see if you like the thickness and the taste. If it is not thick enough, then add more ice and continue to blend. 
    6. If you prefer a sweeter smoothie (I DO!) then add your choice of sweetener and blend for 20-30 seconds. Taste again and add more sweetener if desired.
    7. Drink and Enjoy (and hide if you don't want to share)! 
    Oops! Iot a little excited, and after I tasted it I couldn't stop!

    If you like this recipe, please feel free to CLICK one of the "Reactions" below above the comments and/or add this recipe to your Pinterest board and/or share on Facebook! Thanks!

    Notes:
    *I buy fresh strawberries, cut them, and put them in the freezer for later use. You can also buy a huge bag of frozen cut strawberries at Sam's for a GREAT price. When I'm short on time, I buy those. If you don't have frozen strawberries, but you have fresh ones then just make sure to add ice to help thicken it.
    **PB2 is an amazing food invention. I am in love. All it is is pressed peanuts that are ground into powder with a tiny bit of added salt and sugar. It has only 45 cals, 1.5g fat, 5g carbs, and 5g protein per 2 tbs. I like to add this to my food for extra protein and flavor.

    If  you decide to use peanut butter instead of the PB2 to increase the protein count then you can, but it will also increase the fat and calories tremendously. The PB2 doesn't add much of a taste to this smoothie, so you can also just leave it out. 
    ***My son and I can not have cow's milk. I prefer to use the unsweetened almond or almond/coconut milk. If I am making a smoothie for my son, I use the original flavor soy milk and usually do not need to add sweetener to it or I may use a half of a banana or some honey. For my husband, I would use 2% cow's milk. We have TONS of milk in our fridge HA! 
    ****Since I am watching my sugar intake, I use Splenda or Stevia to add sweetness to my smoothies. My husband prefers to just use sugar or honey. As I mentioned earlier, I usually add half a banana or honey to my son's smoothies if needed. 

    Nutrition Facts:
    (for the whole recipe)
    Cals-169, Fat-6g, Carb-25g, Sugar-3g, Pro-9.7g

    Thursday, May 15, 2014

    Protein Packed, Low Carb, Fast and Easy Egg Wrapped Cups

    Ever since I had Gestational Diabetes with my first child, I switched over to a more balanced way of eating. I have always CRAVED carbs. I heart them. :) The problem is that my body does not heart them, and when I eat too many carbs I gain weight very quickly (unless I'm running 50 miles a week like I did in college), get hypoglycemia, headaches, and apparently Gestational Diabetes when pregnant. Not cool.

    The nutritionist I had to see throughout my whole pregnancy told me how to eat a more balanced diet to control my blood sugar with diet and not need medication. It worked like a charm. Of course we need SOME carbs to survive, and I still eat them but in moderation. These nifty Egg Wrapped Cups are the perfect snack or breakfast for anyone desiring to follow a lower carb way of eating, are gluten-free, eat paleo, or just like eggs. PLUS, they are delicious. I don't even like egg yolks that much, but these cups are addictive.


    I found the original recipe here. It's one of the easiest recipes ever made. Even the most inexperienced cook can make these. I also think they are quite pretty. Isn't that bright yellow yolk a beautiful sight??

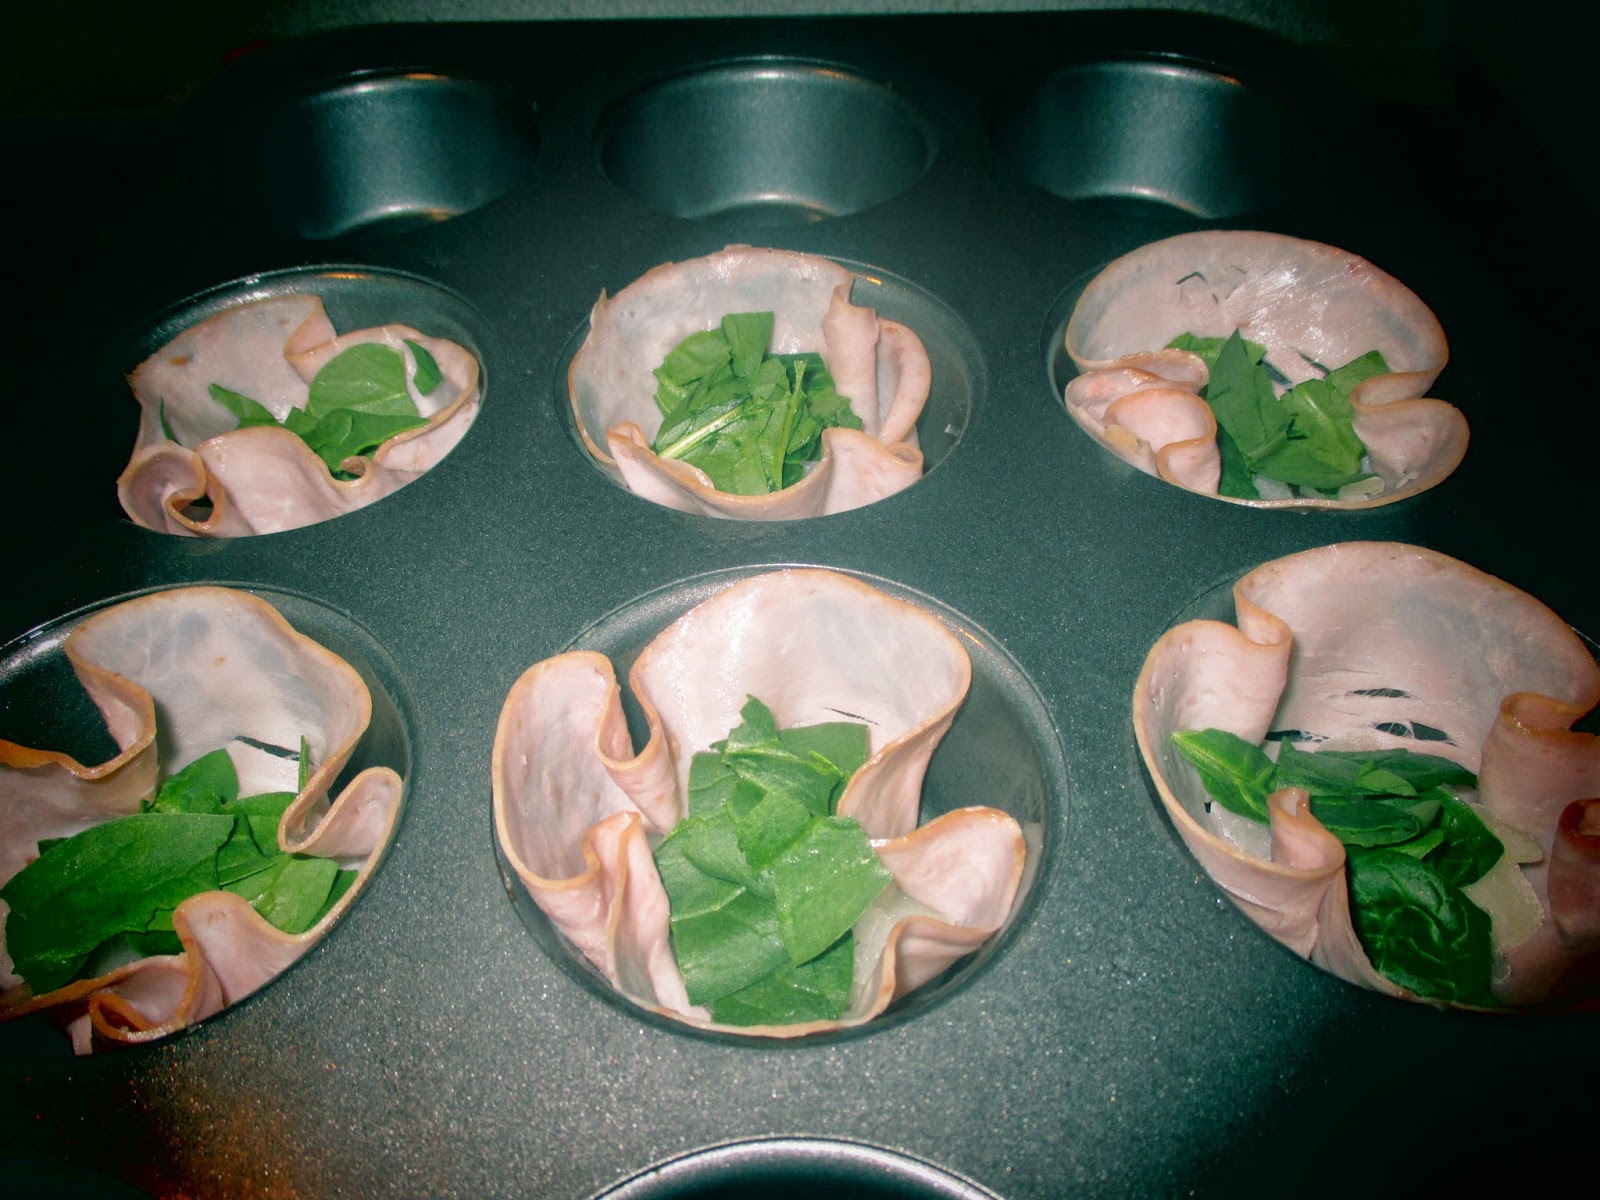
    First, spray a muffin pan and place ham (chicken also works) lunch meat into the cups.
    Place 1-2 tbs chopped onions in the meat.
    Shred some fresh spinach and place on top of onions.

    Crack an egg for each cup and drop onto the spinach.
    On the left 2, I sprinkled some Italian seasoning.
    On the right 4, I tried paprika and black pepper. Both were great!

    After I adapted a lowER carb diet during my pregnancy, I continued to keep the same diet after I had my baby. Great news is that when I got pregnant again I did NOT have Gestational Diabetes. I truly believe this had a lot to do with how I changed my eating habits. It works guys! I'm not trying to convert you...just telling my story. Enjoy these Egg Wrapped Cups and keep those blood sugars balanced and your body not crashing as an added plus! Make sure you keep these in a container in the fridge and eat them cold or heat them up in the microwave or oven when ready to eat. They were still good after 3 days in our house...they've never made it longer than that. Ha!

    Fast and Easy Egg Wrapped Cups
    (Can be gluten free, milk free, nut free, refined sugar free, low carb, Paleo, high protein)
    Makes as many servings as you desire. You can make 1 or 12 or 24! This recipe is for 6. 

    Ingredients
    • 6 slices of thin lunch meat (ham, chicken, or turkey will work)*
    • 1 tbs diced onions for each Egg Cup (6 tbs total)**
    • 2 tbs fresh spinach leaves shredded per Egg Cup (12 leaves total)**
    • 6 eggs
    • Any spices prefered (I used Italian seasoning, paprika, and black pepper)
    • Spray cooking oil

    Directions
    1. Preheat oven to 375 degrees F.
    2. Spray muffin tins with cooking oil.
    3. Place 1 slice of lunch meat in each sprayed cup.
    4. Put 1 tbs onions in cup and 2 tbs shredded spinach leaves on top of onions.
    5. Crack an egg on top of the spinach and season with desired spices.
    6. Bake for 20 minutes or until yolk is cooked and set.
    7. Allow to cool for a couple minutes and enjoy!
    If you like this recipe, please feel free to CLICK one of the "Reactions" below above the comments and/or add this recipe to your Pinterest board and/or share on Facebook! Thanks :) 

    Caution: Juice will leak out of the cups while you eat them. If they do not cool enough, the juice could possibly burn you. Make sure to let them cool thoroughly. Also be sure to eat over a plate (or in a sandwich bag if on the go) to prevent a mess...and a need to change your clothes ;)


    Notes:
    *I use very thin slices of meat from Kroger. I use this brand (Kroger Deli Style Lean Smoked Ham) to come up with the Nutrition Facts. Each slice has 12 calories.
    **Be creative and try other vegetables! I think green peppers, red peppers, carrots, etc. could work nicely. I used frozen already chopped onions for this recipe. Huge time saver, AND my body hates cutting onions. Not a pretty sight!

    Nutrition Facts:
    (per Egg Cup)
    Cals-90, Fat-5.5g, Carb-2g, Sugar-0g, Pro-8.1g